How to start a seed garden (and why you should)
A seed garden is simply a group of native plants grown with the goal of harvesting their seeds, the way someone would grow vegetables with the goal of harvesting food. But why would you want to produce seed in the first place?
One great reason is that by increasing the supply of native plant seeds, you’re taking an important step towards restoring habitat for birds, bees and other wildlife. WWF-Canada has a goal to regenerate Canada by restoring at least 1 million hectares of wildlife habitat by 2030 — and you can help!
Our new native plant how-to hub, re:grow, is designed to support people who want to contribute to this ambitious effort. Growing a seed garden is a critical conservation action that helps increase the availability of native plants in your community, local species that may not be widely available at nearby nurseries or garden centres. Then you can share the results with family, friends and neighbours who also want to grow native plants.
And, of course, the process of growing seeds to help increase native plant populations also produces a beautiful garden that blooms and fruits throughout the seasons, providing food and habitat for wildlife.
(Oh, and there’s also something called a “seed orchard,” which is essentially a seed garden on a larger, more intensively managed scale — something you may want to take on if you have a large enough piece of land to work with.)
You can start your seed garden by following the steps below:
Step 1: Plan your garden

When picking a location, consider:
Size – A bigger location can give you more flexibility, but requires more work for preparation and maintenance.
Sun – Map the areas of your seed garden and determine if they are full shade, part shade (3-6 hours of sun per day) or full sun.
Soil – Find out your soil texture by using either the ribbon test or the jar test. It’s important to know what proportions of sand, silt and clay particles make up your soil. Some plants prefer sandy soils, while others prefer a mix.
Water – While native plants will be adapted to the rain cycles in your area, it will take some time for their root systems to develop, so make sure you have access to water near the site.
Wind – The ideal site would be sheltered from the wind somehow, either in a valley or with trees, to prevent wind-dispersed seeds from getting blown away.
When picking your plants:
- Check with your local municipality to see if there is a seed strategy or significant plant species list.
- Reach out to pollinator groups, gardeners and other potential users of native seeds to find out which species are most frequently in demand.
- The ideal density is four plants per square metre, keep that in mind when selecting species.
- Make sure you are sourcing pure native species. There are many cultivars for sale in garden stores.
- Consider purchasing plants from multiple suppliers to introduce some variation, but where possible, choose nearby suppliers so plants will be well-adapted to local conditions.
- If you are growing your plants from seed, make sure you use seeds that are collected from more than one plant.
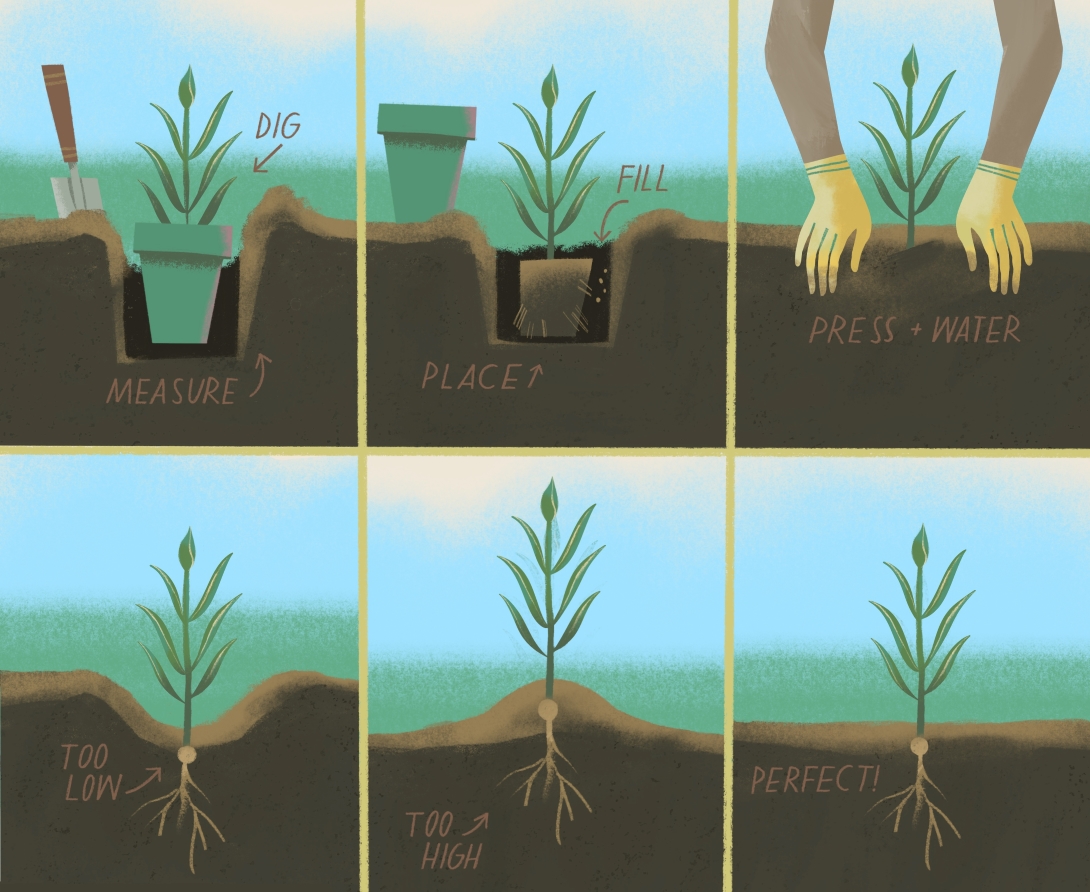
Step 2: Prepare and plant your garden
If you have planned your garden ahead of time and prepared a space, planting should be a simple matter of putting baby plants into the soil.
The best times to plant are in the spring or early fall, when it’s not too hot out and rains frequently.
Step 3: Manage your seed garden
In the spring, consider taking these actions to enhance your seed garden and ensure the harvest is plentiful:
- Pull weeds. Many common invasive species, such as garlic mustard, goutweed and buckthorn seedlings, are easiest to pull in the spring, when they are still small.
- Add new plants to replace ones that have died.
- Record which plants flower when. This is valuable information that can help you predict when seed will be ready.
- Add mulch to the plant areas or to pathways in between.
- Top-dress the seed garden with a small amount of compost to add nutrients.
Step 4: Harvest your seeds
Seed is ripe when it starts to come away from the plant on its own. The exact signs of ripeness vary from one species to another, but a general guideline is that ripe seed is brown, dry and falls away from the plant easily. Seeds or seedpods that are green are likely not ready.
In order to be effectively stored, seed should be cleaned by separating the seeds from the plant material (chaff). There are four main types of seed:
Fluff (i.e. milkweed, goldenrod, aster)
Separate seed from fluff using gloves to rub seed together over a collection bin. Screens that are big enough to let the seed through can be helpful for separating the seeds and chaff.
Tube (i.e. wild bergamot, blue vervain, black-eyed susan)
Each seed is in a tube called a “calyx.” Cut off entire seedheads, put them in a bag, and shake vigorously. Seed will come out of the tubes and gather at the bottom of the bag.
Pod (i.e. Canada tick trefoil)
These pods are tricky. With small amounts, it’s possible to pop them out one by one. For larger quantities of seed, consider using a coffee grinder (one or two pulses) to break up the pod.
Berries (i.e. Jack-in-the-Pulpit, Virginia creeper)
Generally seeds should be separated from the fleshy fruit, and a modified blender can be very handy for this. You can wrap the blender’s blades in several layers of duct tape to protect the seeds from the sharp edges. The blades will still crush up the berries. Wash away the pulp and, with the aid of a strainer, pick out the hard seeds.

Step 5: Store and share your seeds
Think of what a seed needs to grow: light, heat and water. Give the seeds the opposite of that for storage: dark, cool and dry. Ensure your seeds are completely dry by leaving them out for a few weeks.
November and December are great months to share your seeds. Consider donating seed to a seed library. Some cities have dedicated native seed libraries, while others are home to seed libraries that will also accept native seeds. Keep track of where your seed went and follow up to see if it germinated.
Step 6: Grow plants from seed
One great use for seeds from a seed garden is to grow plants to give away in the spring or to enhance plantings in your own seed gardens. Now is the time to begin cold-moist stratification, either by using your fridge to simulate it or sowing seeds in pots outdoors.
Learn even more about seed gardens
To learn more about how to start a seed garden and track your impact as part of our larger collective effort to regenerate Canada, join us on re:grow.